
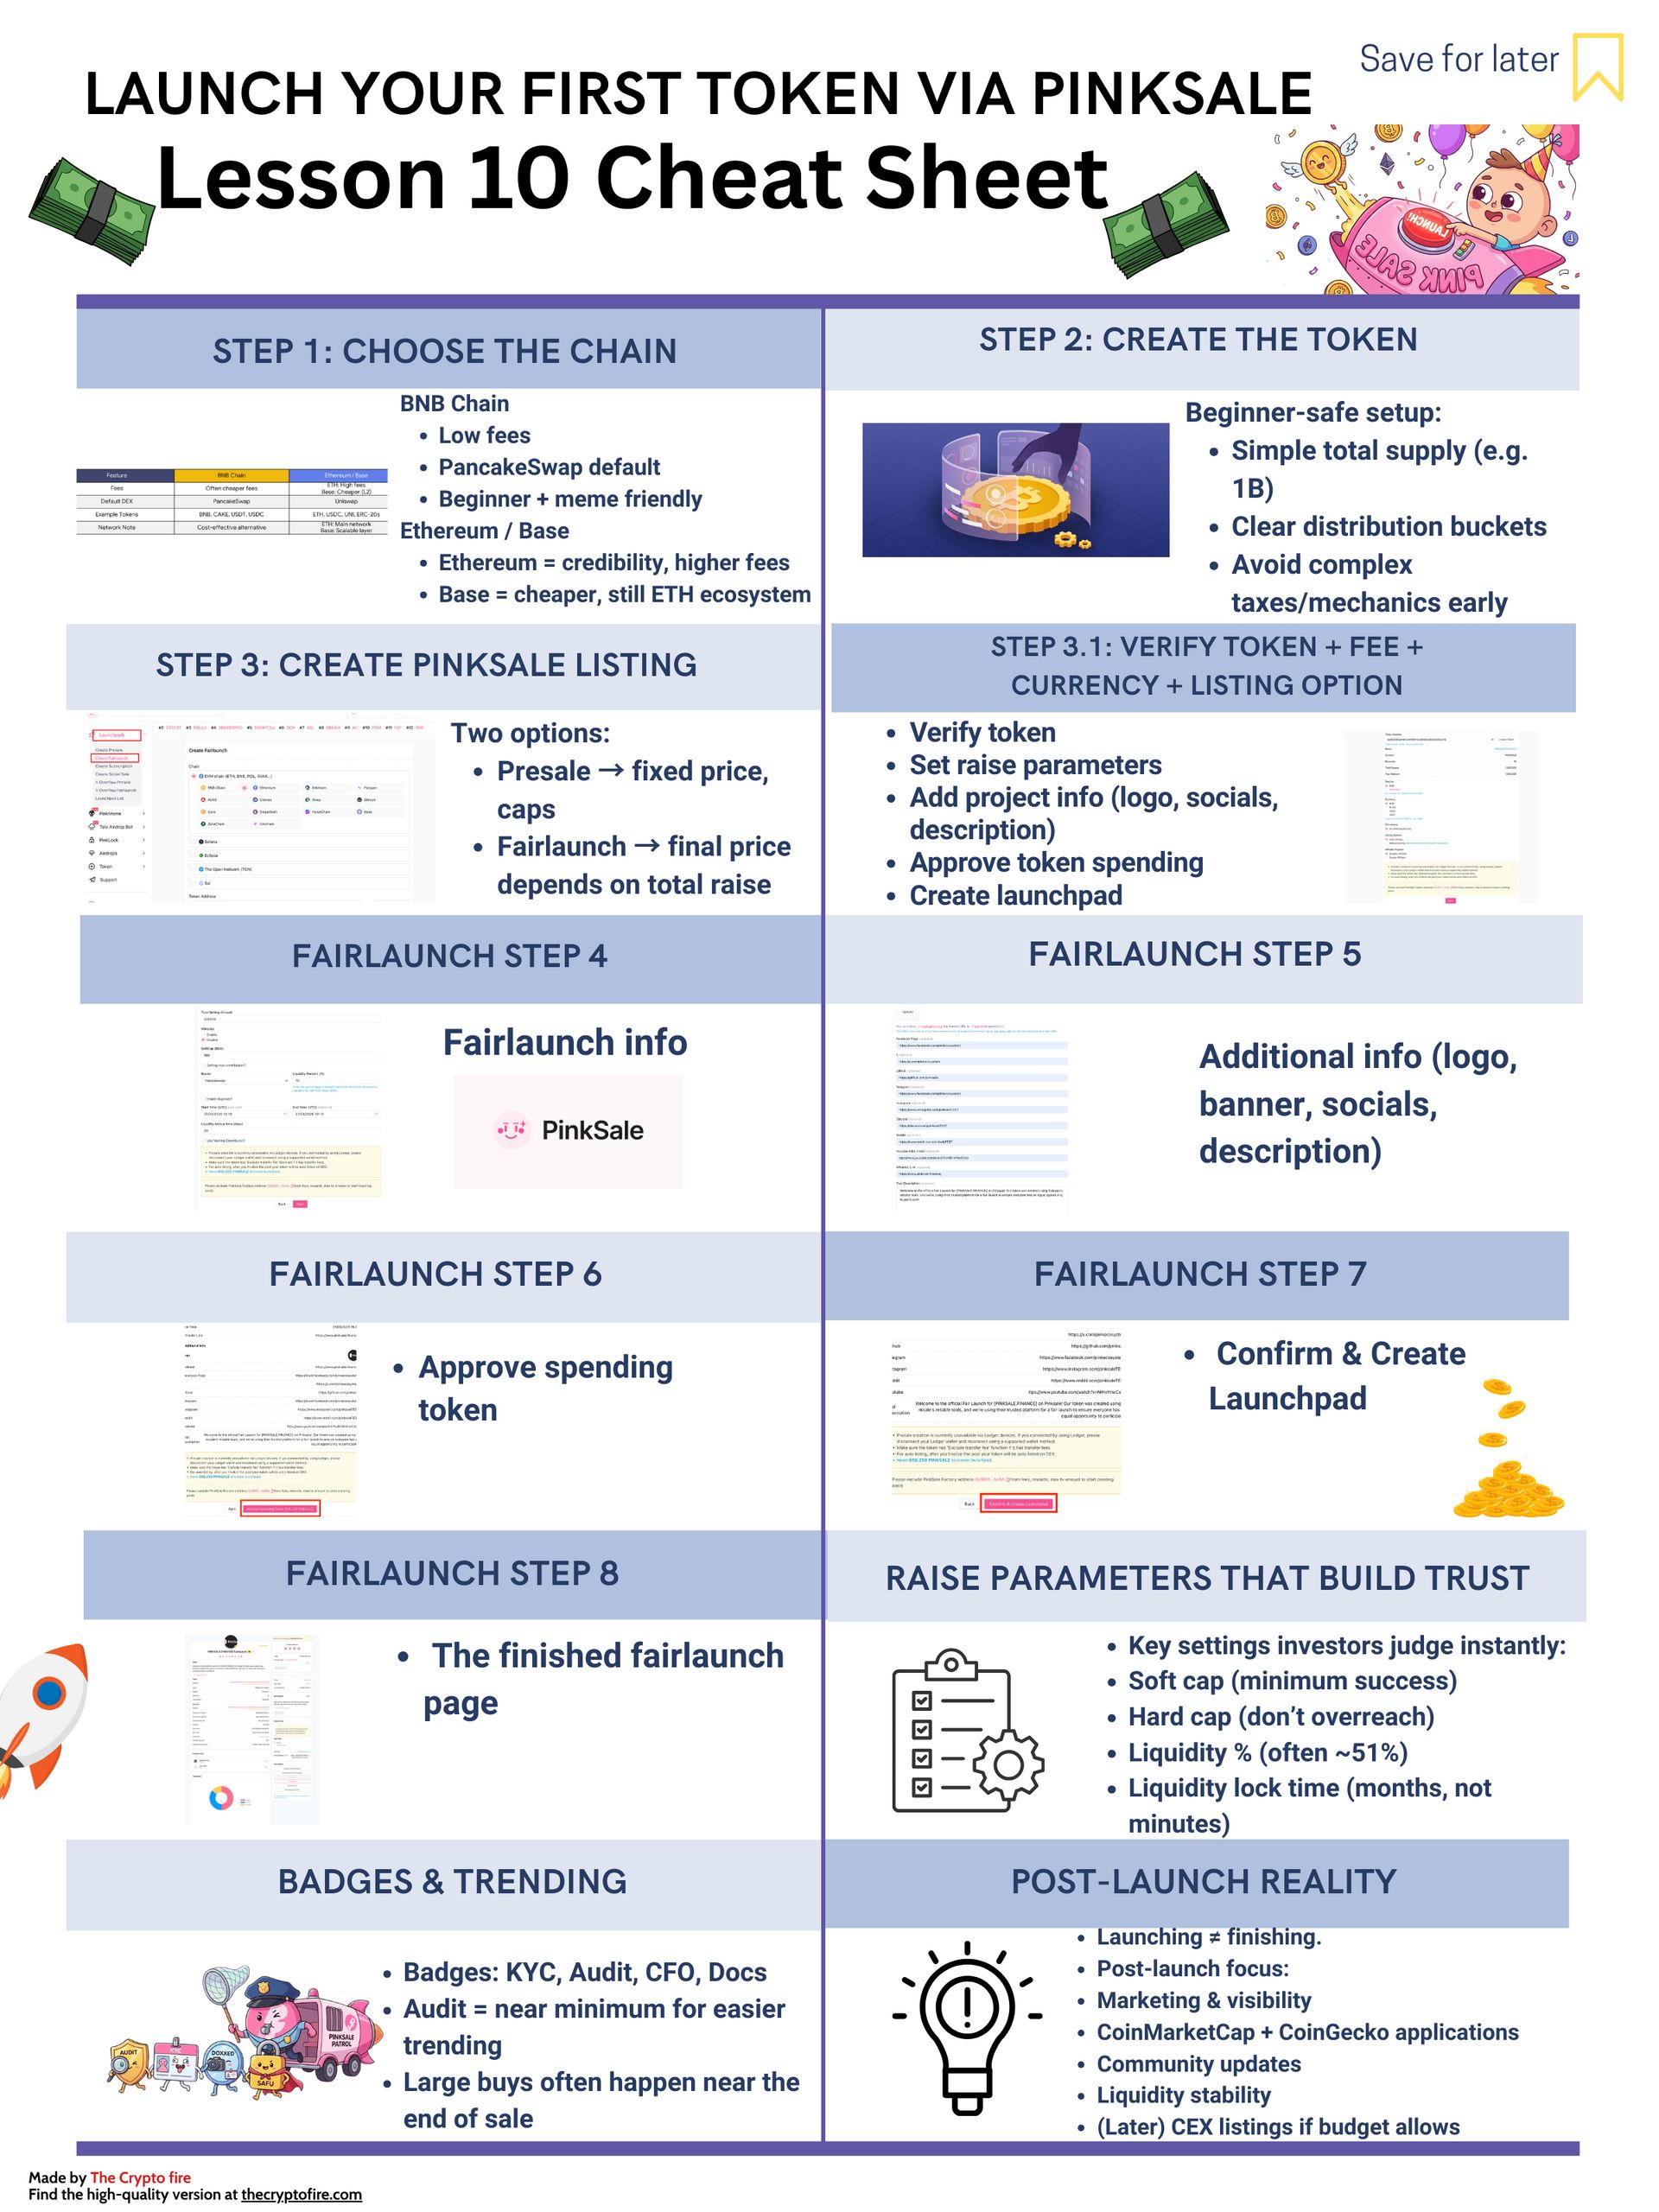
A step-by-step guide to launching a token with PinkSale.
TL;DR BOX
This lesson shows the full, real launch pipeline using PinkSale: choose a blockchain, create a simple token, run a fairlaunch or presale, auto-create and lock liquidity, enable DEX trading, then push post-launch visibility. PinkSale works like a crypto Kickstarter, letting you raise funds and generate liquidity without fronting large capital yourself.
The key to looking legit is not hype, but clean parameters: realistic soft/hard caps, clear liquidity %, and a meaningful lock time. These numbers signal trust. AI is used to save time and reduce mistakes: writing listings, stress-testing parameters, creating FAQs, planning marketing, and keeping everything consistent under pressure.
Key points
Fact: PinkSale can auto-create and lock liquidity after a sale.
Mistake: Setting unrealistic caps or messy parameters that scare investors.
Action: Use AI to review your settings like a cautious investor before launch.
Critical insight
A token launch succeeds when the pipeline is clear and boring clarity builds trust, and trust attracts capital.
Table of Contents
Before we dive in, take this Crypto and Blockchain Cheat sheet – a quick, printable snap shot you can keep open while you read!
Lesson 10: Launch your first Token via PinkSale
In Lesson 9, you learned how a DEX swap actually works from your wallet. Lesson 10 is the big picture: the exact “launch pipeline” I follow: From chain choice → token creation → PinkSale listing → finalize → enable trading → post-launch marketing + CoinMarketCap/CoinGecko (CMC/CG) visibility.
And since our course is “AI + Crypto,” I’ll show you where AI saves the most time: writing listings, planning marketing, creating clean visuals, building FAQs, and keeping everything consistent.
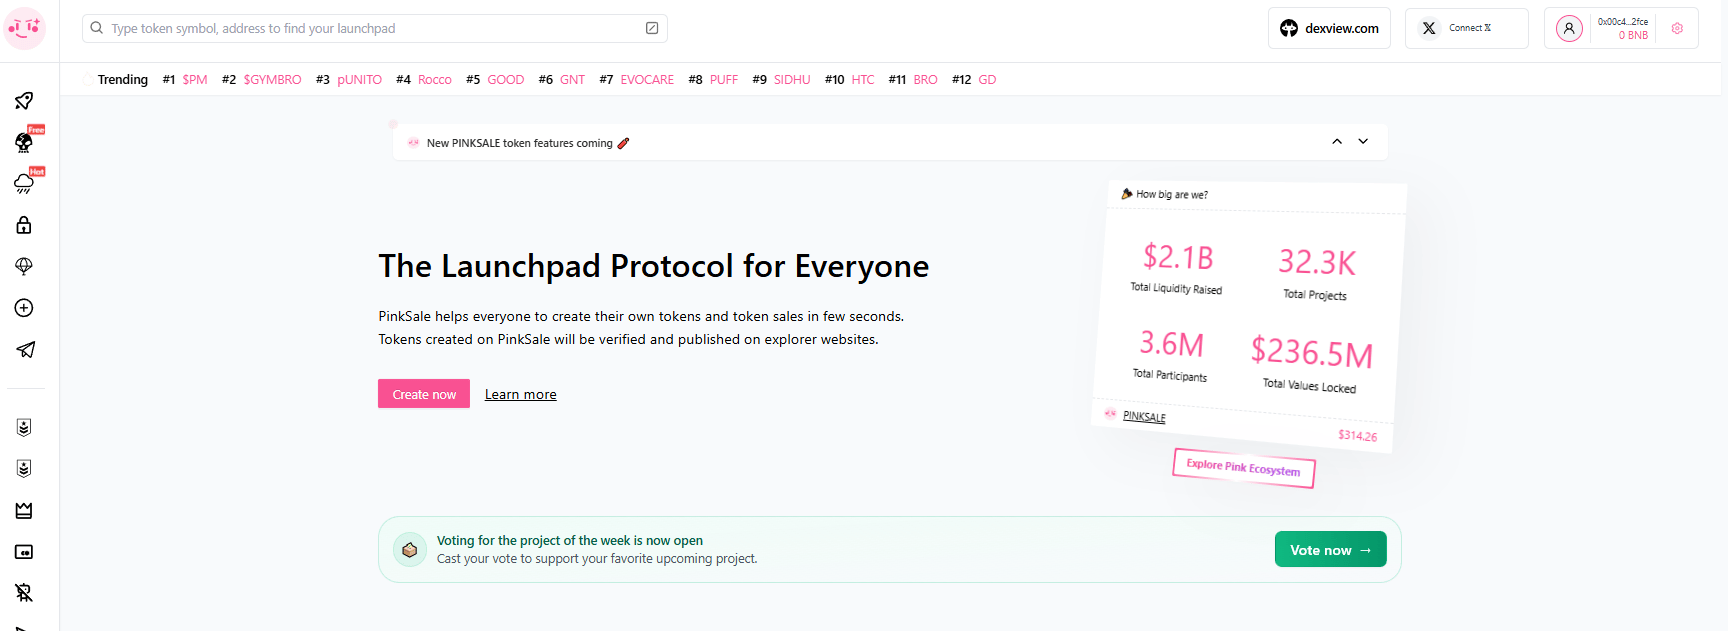
1) What PinkSale is
PinkSale is a decentralized launchpad. You can think of it like Kickstarter for crypto tokens: early supporters contribute (like BNB $BNB ( ▼ 0.68% ) /ETH $ETH ( ▲ 0.3% ) ), and after the sale ends, liquidity gets created on a DEX and trading begins.
There is a huge beginner advantage: you don’t need to come with $20,000+ in liquidity yourself, the launchpad raise can create that liquidity for you.
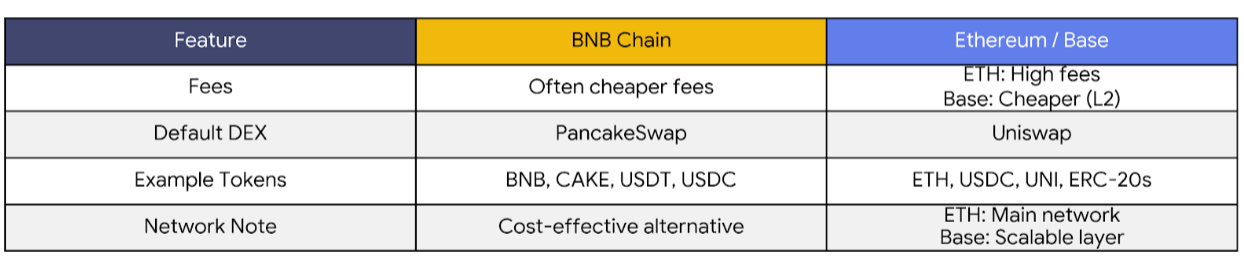
2) Step 1: Choose your chain (BNB Chain vs Ethereum vs Base)
I would keep this decision simple for newbies:
BNB Chain
-
Often cheaper fees than Ethereum
-
The “default DEX” most people use is PancakeSwap
-
Example tokens you’ll always see around this ecosystem: BNB, CAKE, USDT $USDT ( ▲ 0.0% ) , USDC $USDC ( ▲ 0.0% )
Ethereum vs Base
-
Ethereum is the main network but fees can be high
-
Base can be cheaper while still being part of the Ethereum ecosystem
-
The default DEX is often Uniswap
-
Example tokens: ETH, USDC, UNI $UNI ( ▲ 2.85% ) , plus tons of ERC-20 tokens
How AI helps here (fast):
-
I use ChatGPT / Claude / Gemini to compare chains for my situation (budget + audience + ecosystem).
-
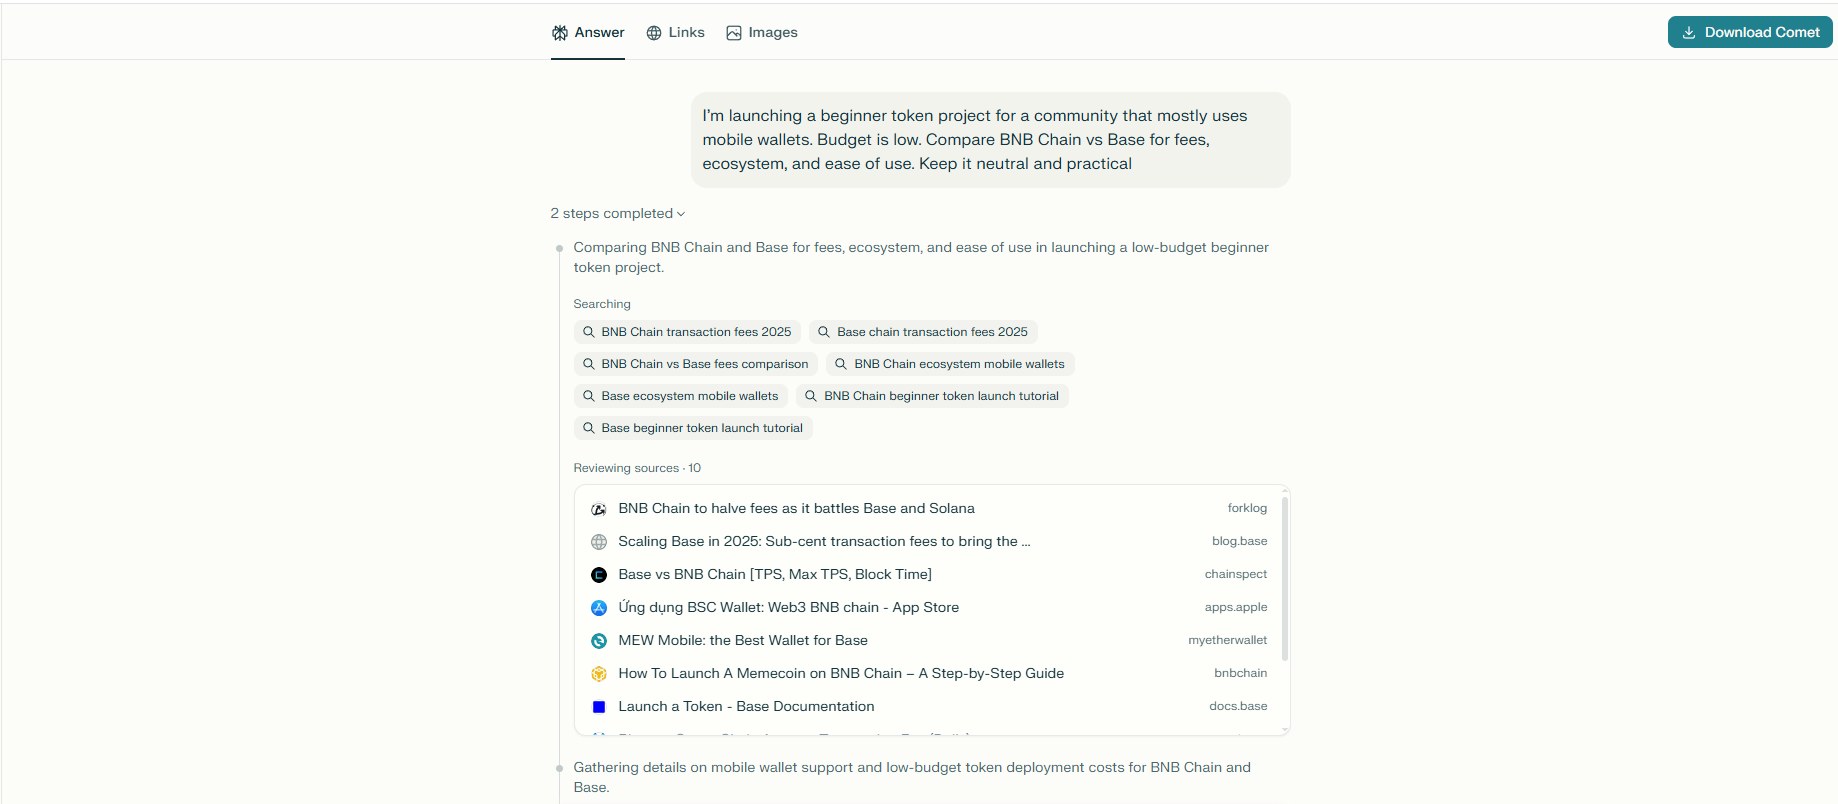
I use Perplexity when I want current facts (fees, recent network issues, official links), because it’s web-backed.
Example prompt I would use:
“I’m launching a beginner token project for a community that mostly uses mobile wallets. Budget is low. Compare BNB Chain vs Base for fees, ecosystem, and ease of use. Keep it neutral and practical.”
3) Step 2: Create the token
You can create a token without deep coding and then use PinkSale to launch it.
For beginners, I keep token design basic and clean:
-
Total supply example: 1,000,000,000 tokens
-
Simple distribution buckets: presale/fairlaunch, liquidity, marketing, partnerships/ecosystem, team/ops (if any)
-
Avoid “crazy taxes” or complicated mechanics early – complexity is where mistakes hide.
Token examples you understand instantly:
-
A stable token pair context: USDT $USDT ( ▲ 0.0% ) / USDC $USDC ( ▲ 0.0% )
-
A “blue chip” context: BTC $BTC ( ▲ 1.08% ) / ETH $ETH ( ▲ 0.3% )
-
A DEX ecosystem context: BNB $BNB ( ▼ 0.68% ) / CAKE $CAKE ( ▼ 0.68% ) , ETH / UNI
How AI helps here:
-
ChatGPT/Claude helps me write a clean, honest token description and tokenomics explanation.
-
Notion AI helps me keep everything organized (roadmap, tokenomics, links, launch dates) so I don’t lose track mid-launch.
4) Step 3: Create your PinkSale listing (Presale or Fairlaunch)
What’s the difference?
-
Presale: price is set by you (presale rate + listing rate)
-
Fairlaunch: final price is “fair” because everyone ends with the same price after the pool ends (based on total raised / tokens sold)
Both routes use the same creation structure:
-
Verify token
-
Launchpad info (raise settings)
-
Add project info (logo, website, socials)
-
Finish & create
4A) PinkSale Presale: Step-by-step
PinkSale’s official presale guide follows: token verification → presale parameters → additional info (logo/website, with an AI logo option) → review → approve spending token → create.
Presale Step 1: Find “Create presale”

Presale Step 2: Verify token + select fee + currency + listing option
This is where you paste your token address and choose the basics.

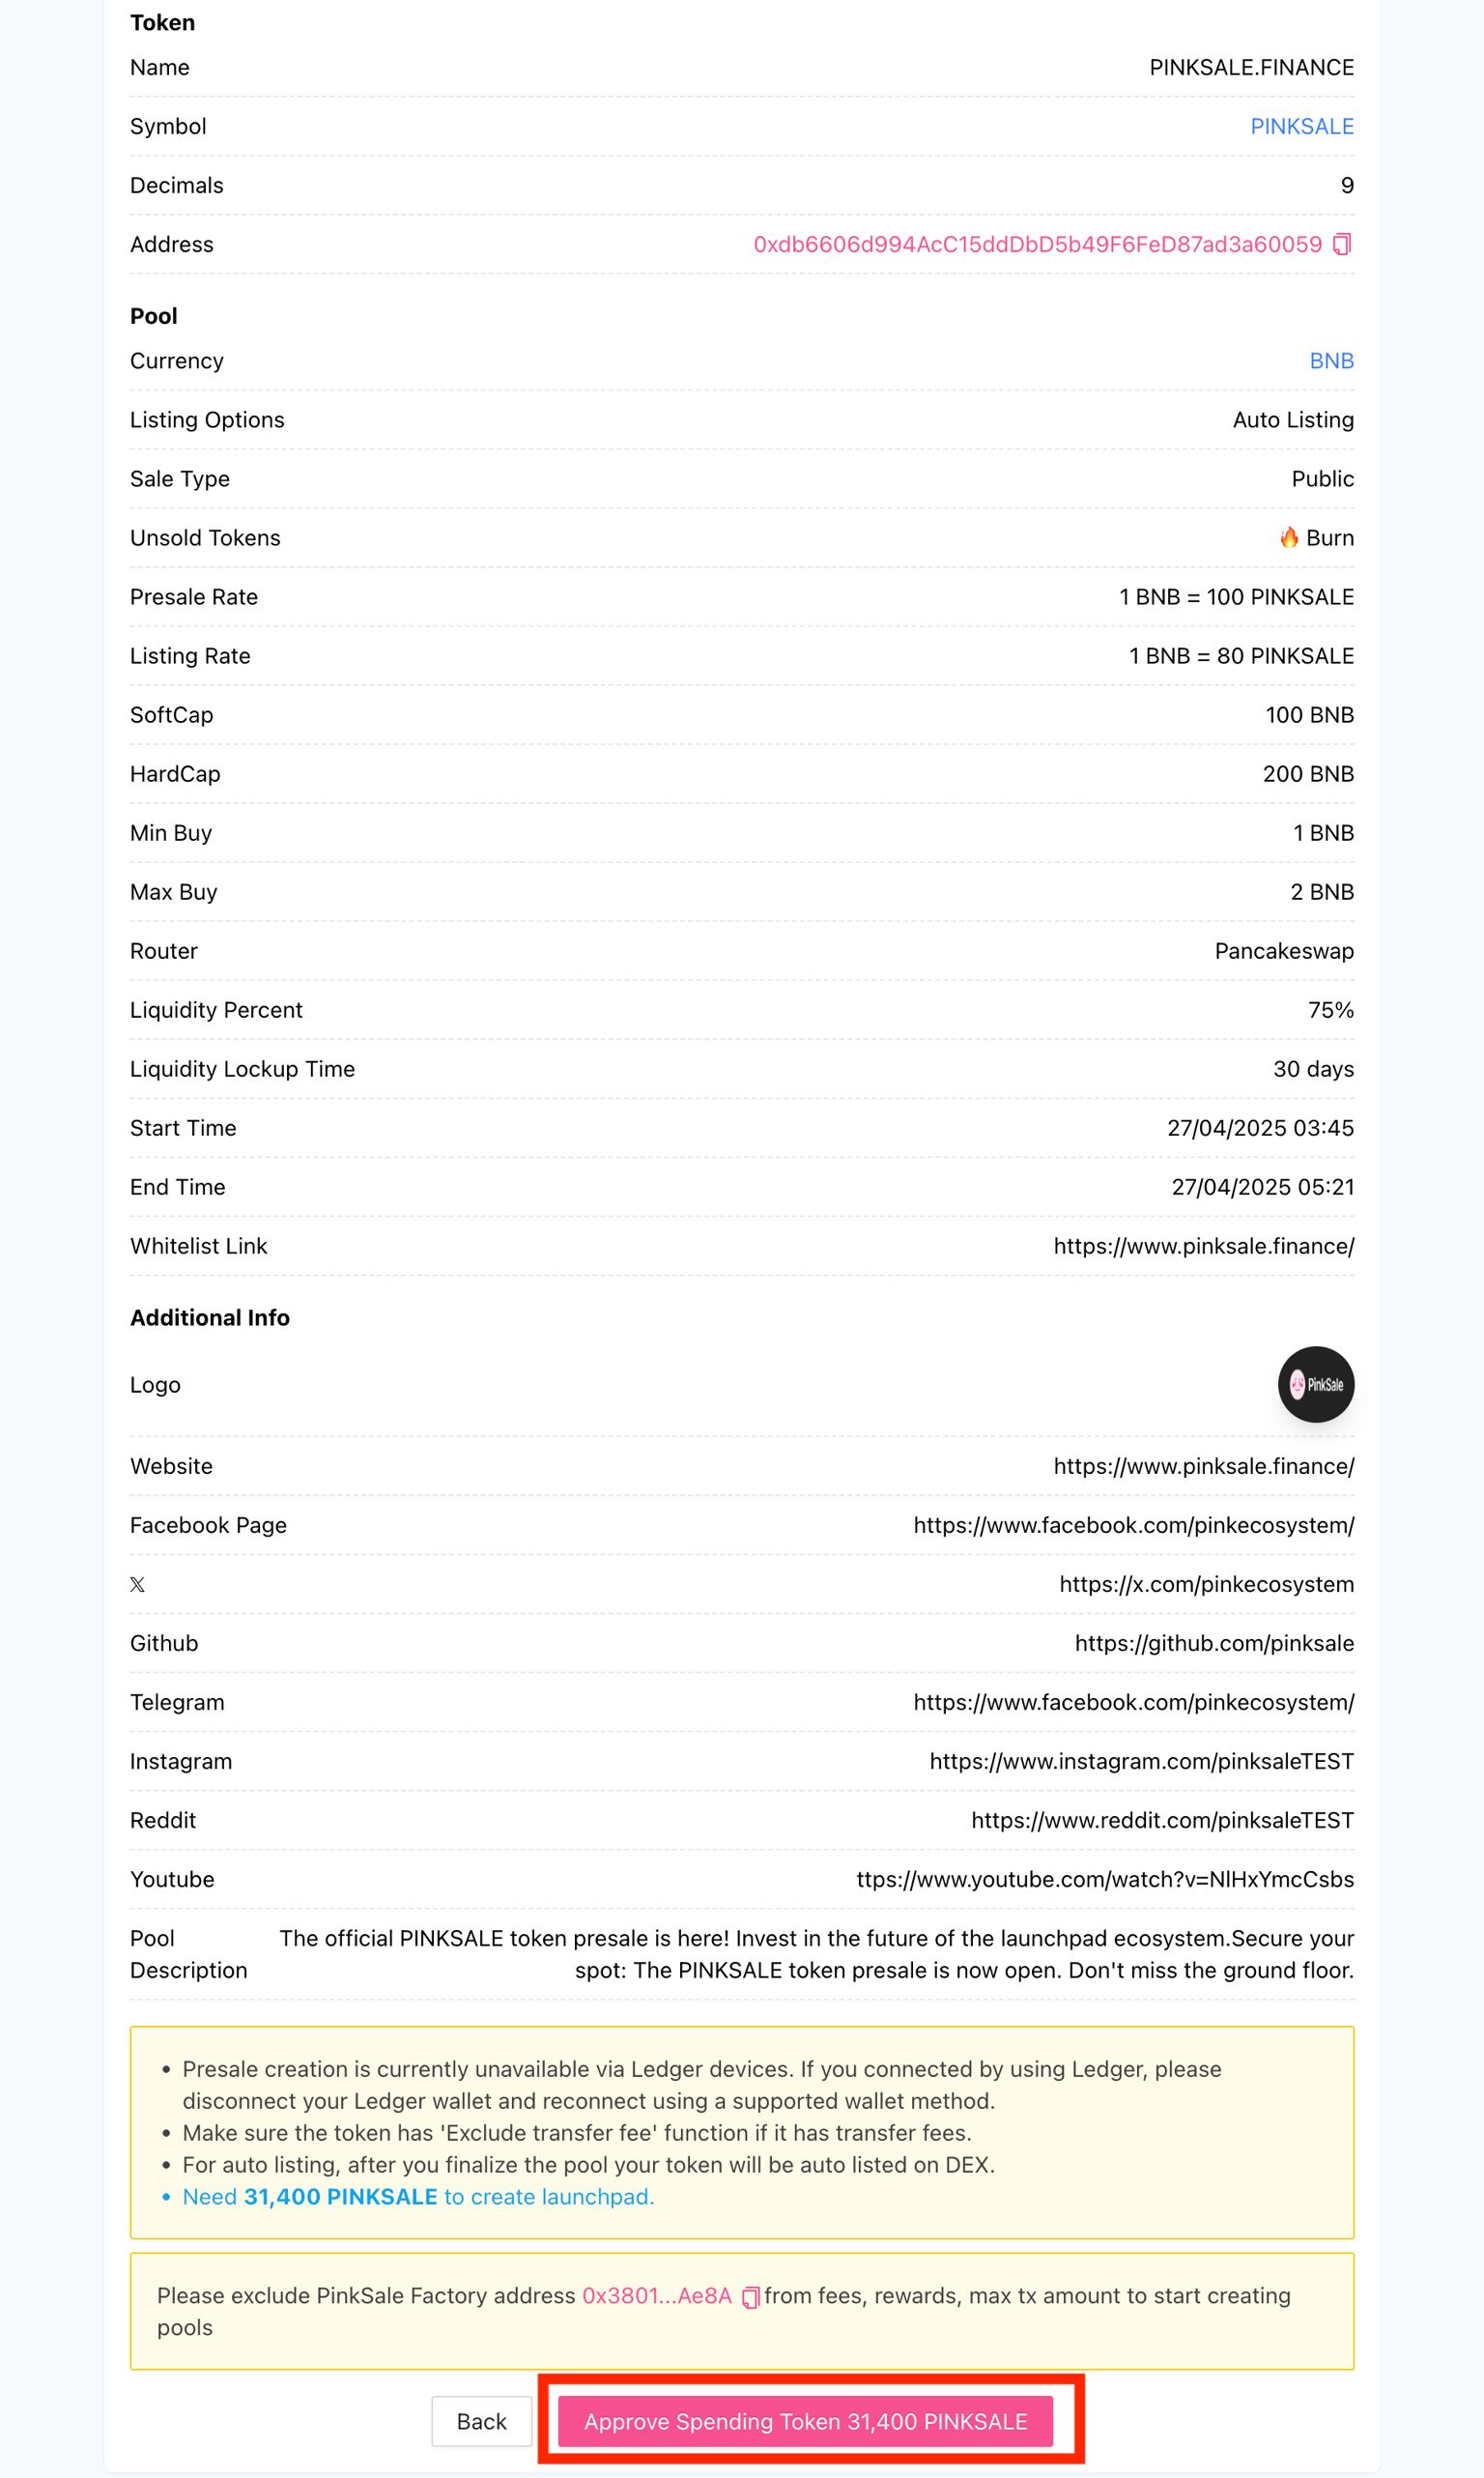
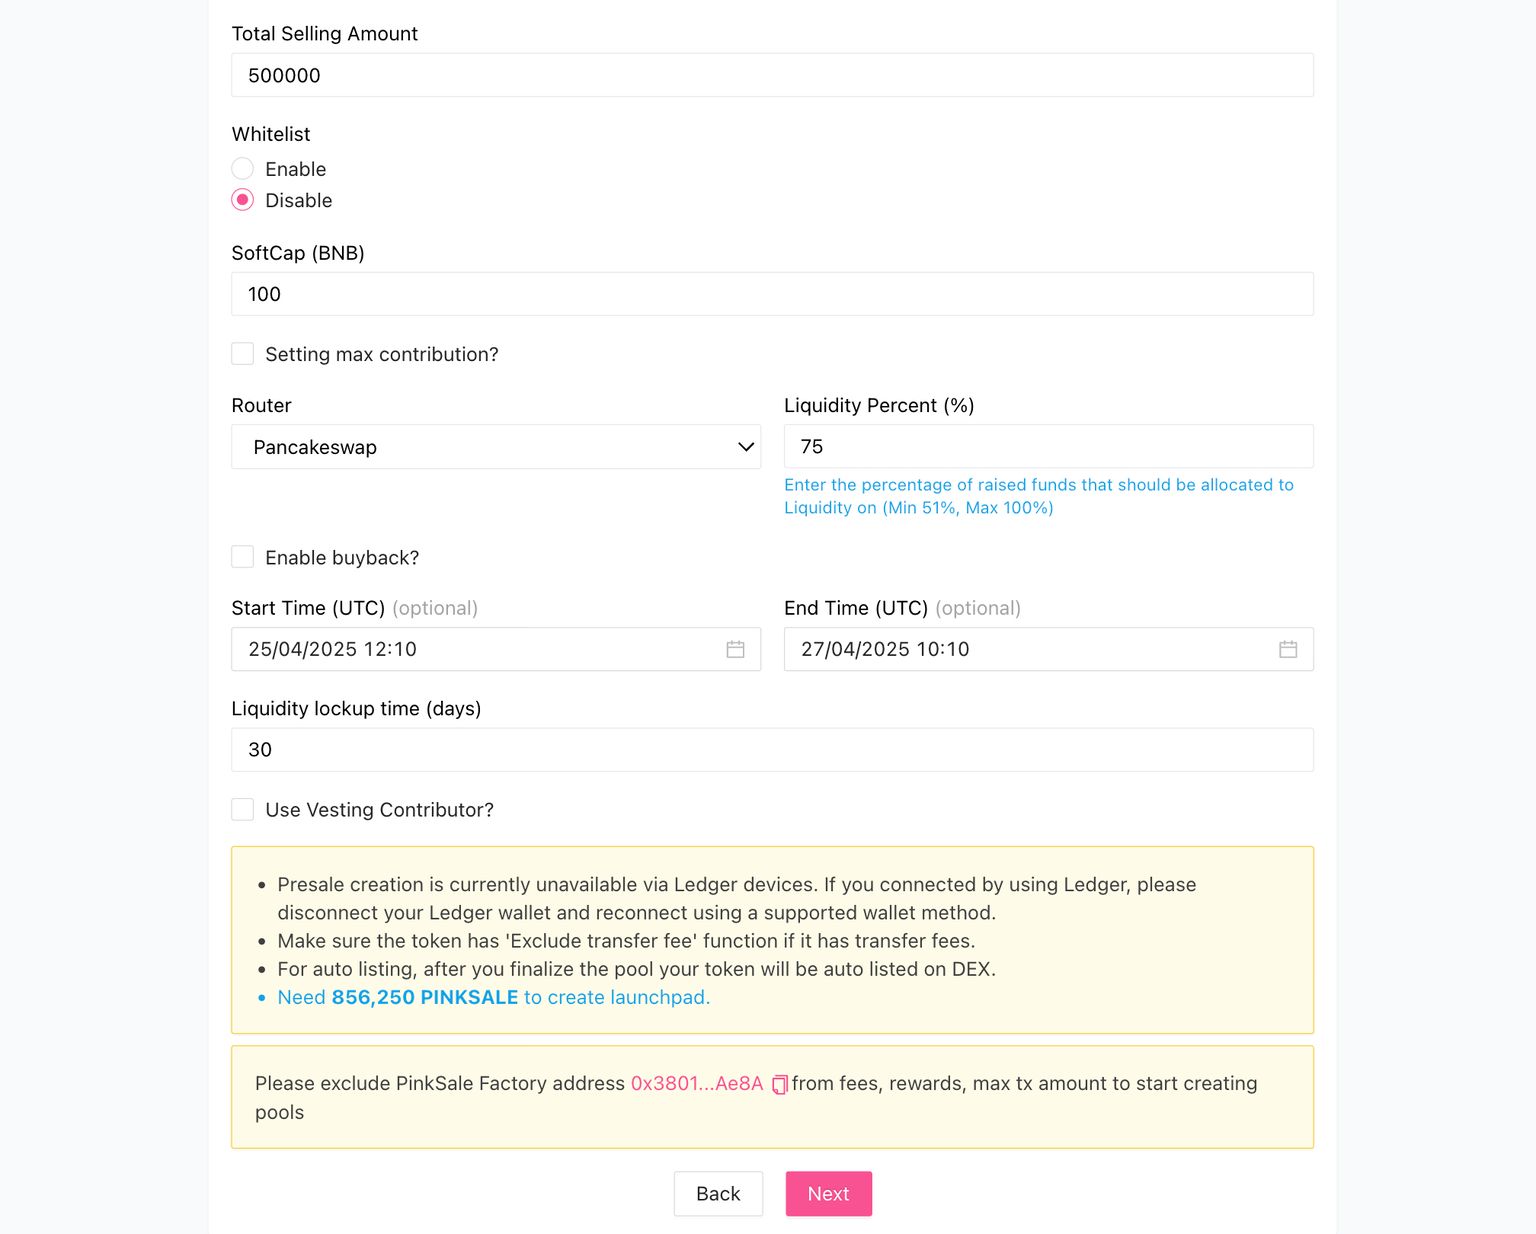
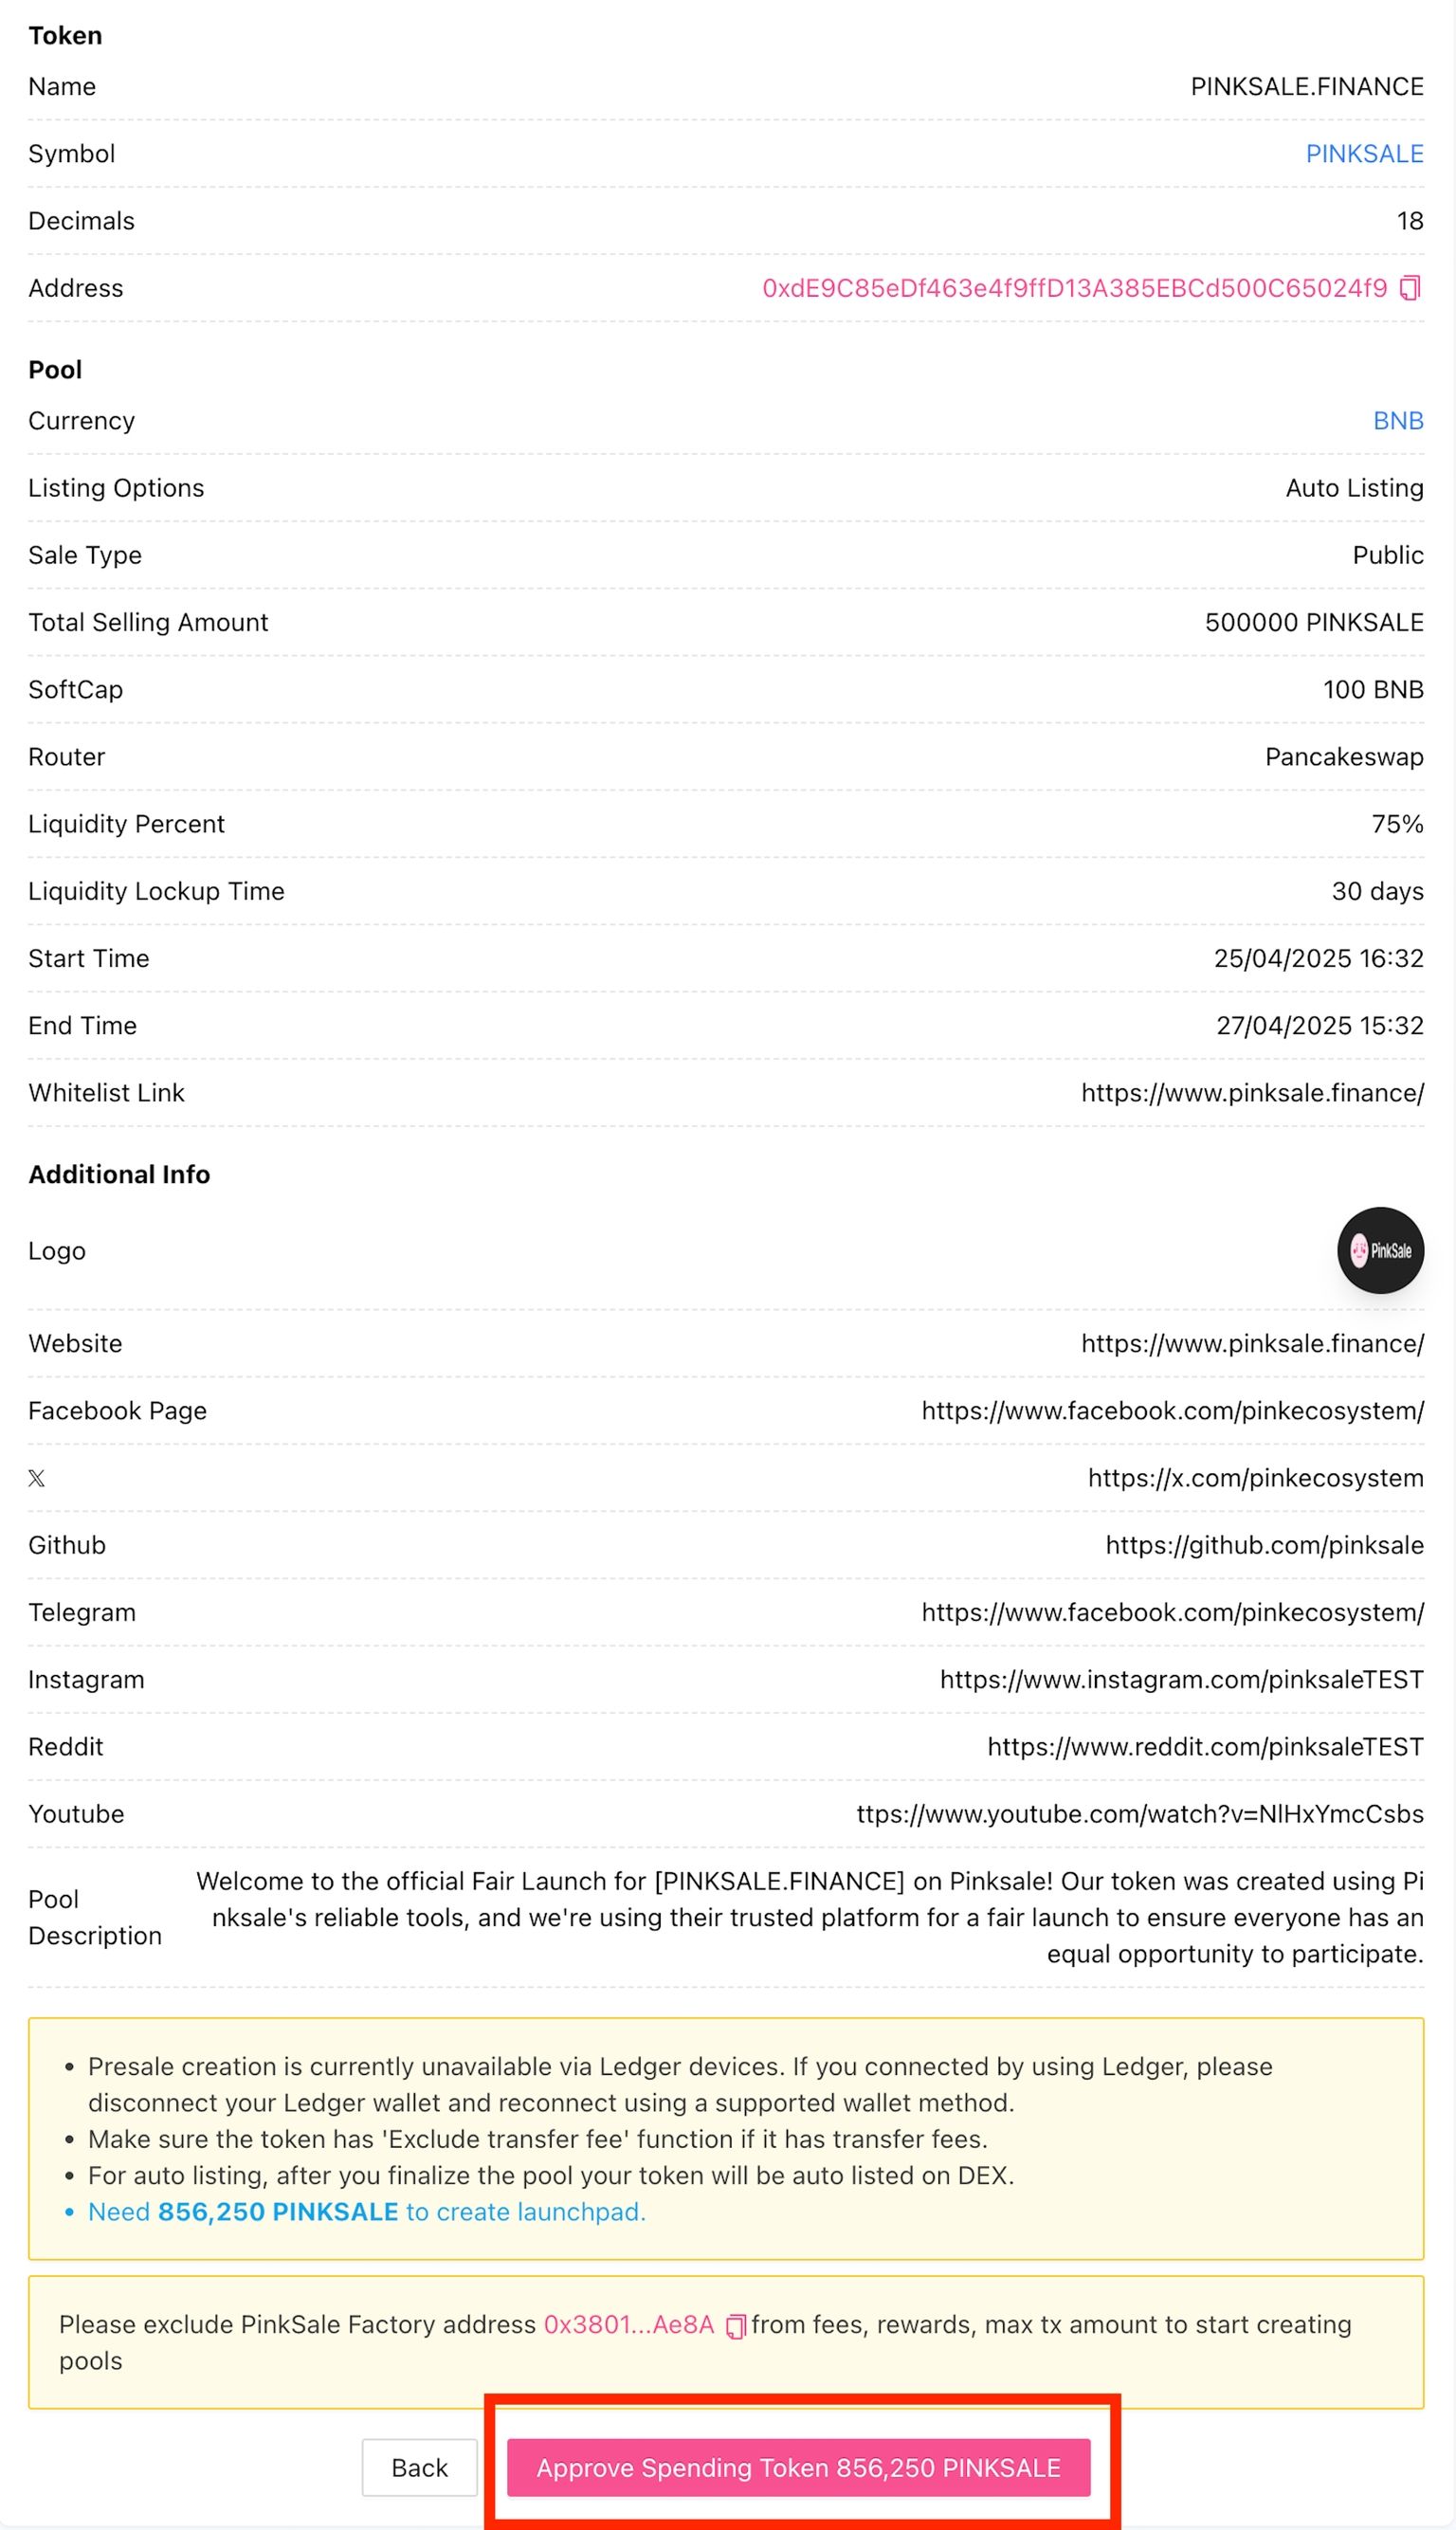
Presale Step 3: Presale parameters (rate, soft cap, hard cap, liquidity %, lock, router)
This is where most beginners either look professional… or accidentally look suspicious.

What I want you to understand here:
-
Soft cap = minimum raise needed for success
-
Hard cap = max you can raise
-
Liquidity % = how much of raised funds becomes liquidity
-
Liquidity lock time = how long liquidity is locked (confidence signal)
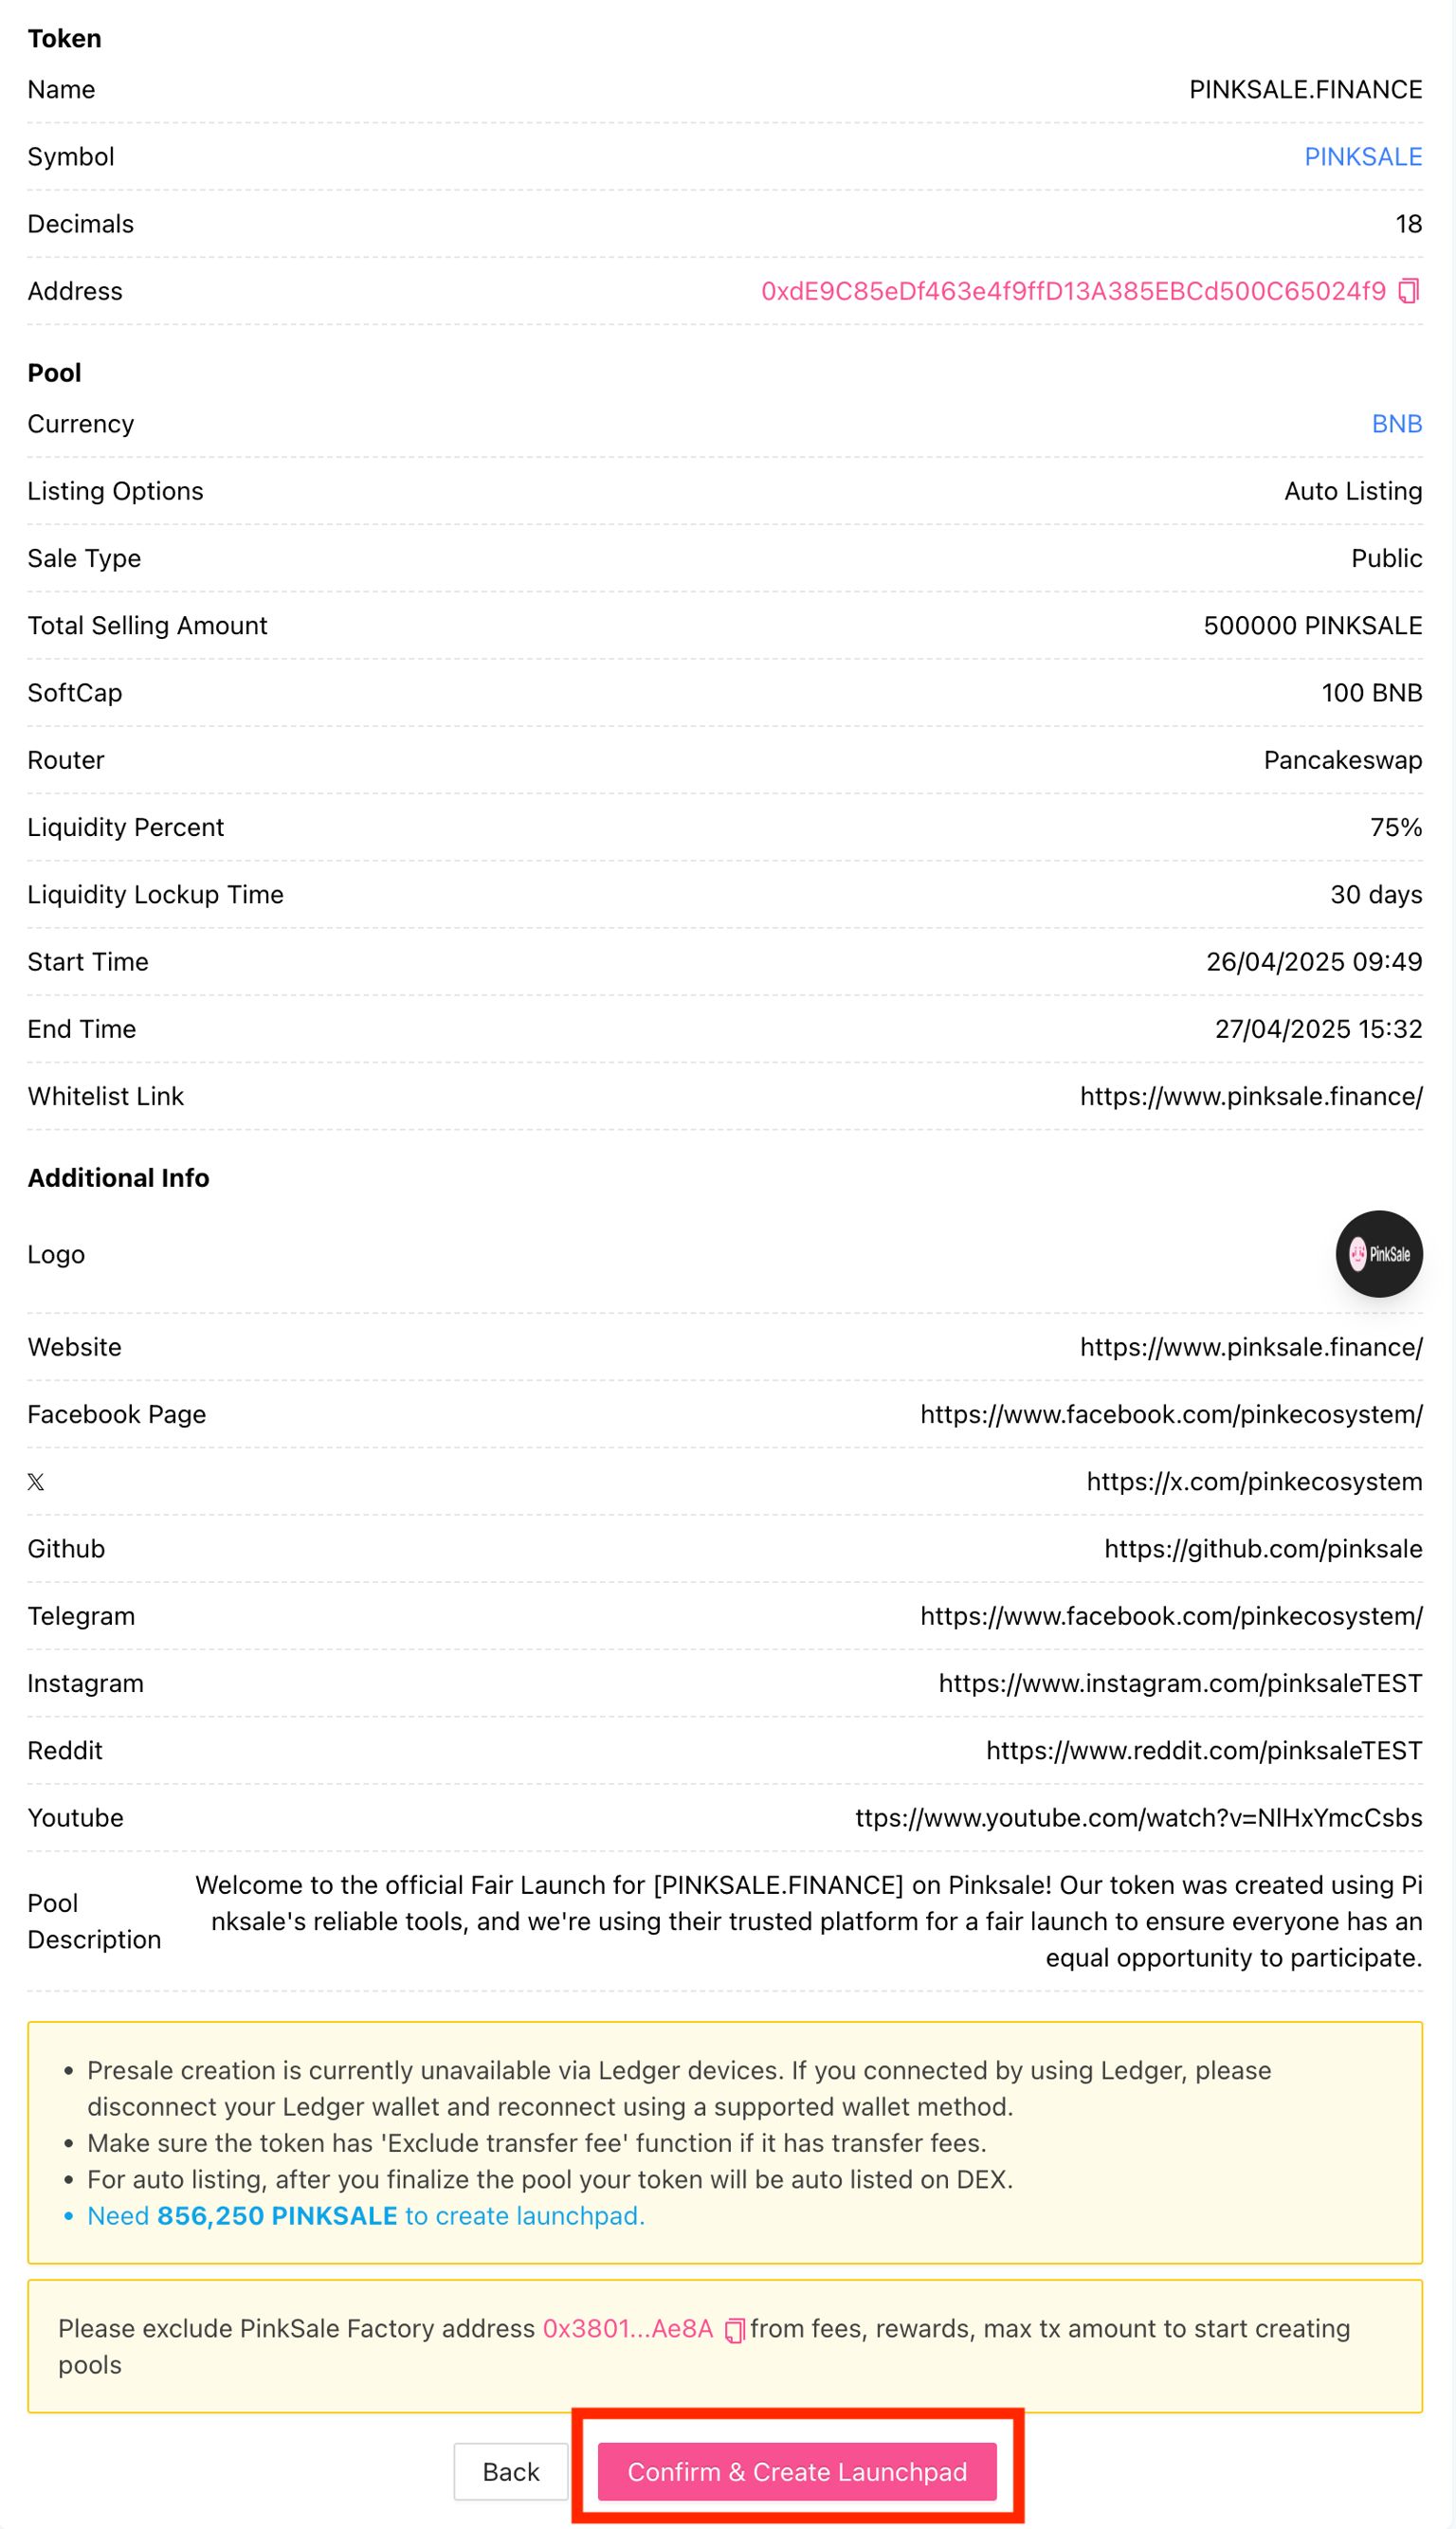
Presale Step 4: Review + approve spending tokens
Before the pool is created, you approve PinkSale to use the required amount of your tokens.
Presale Step 5: Confirm & Create Launchpad
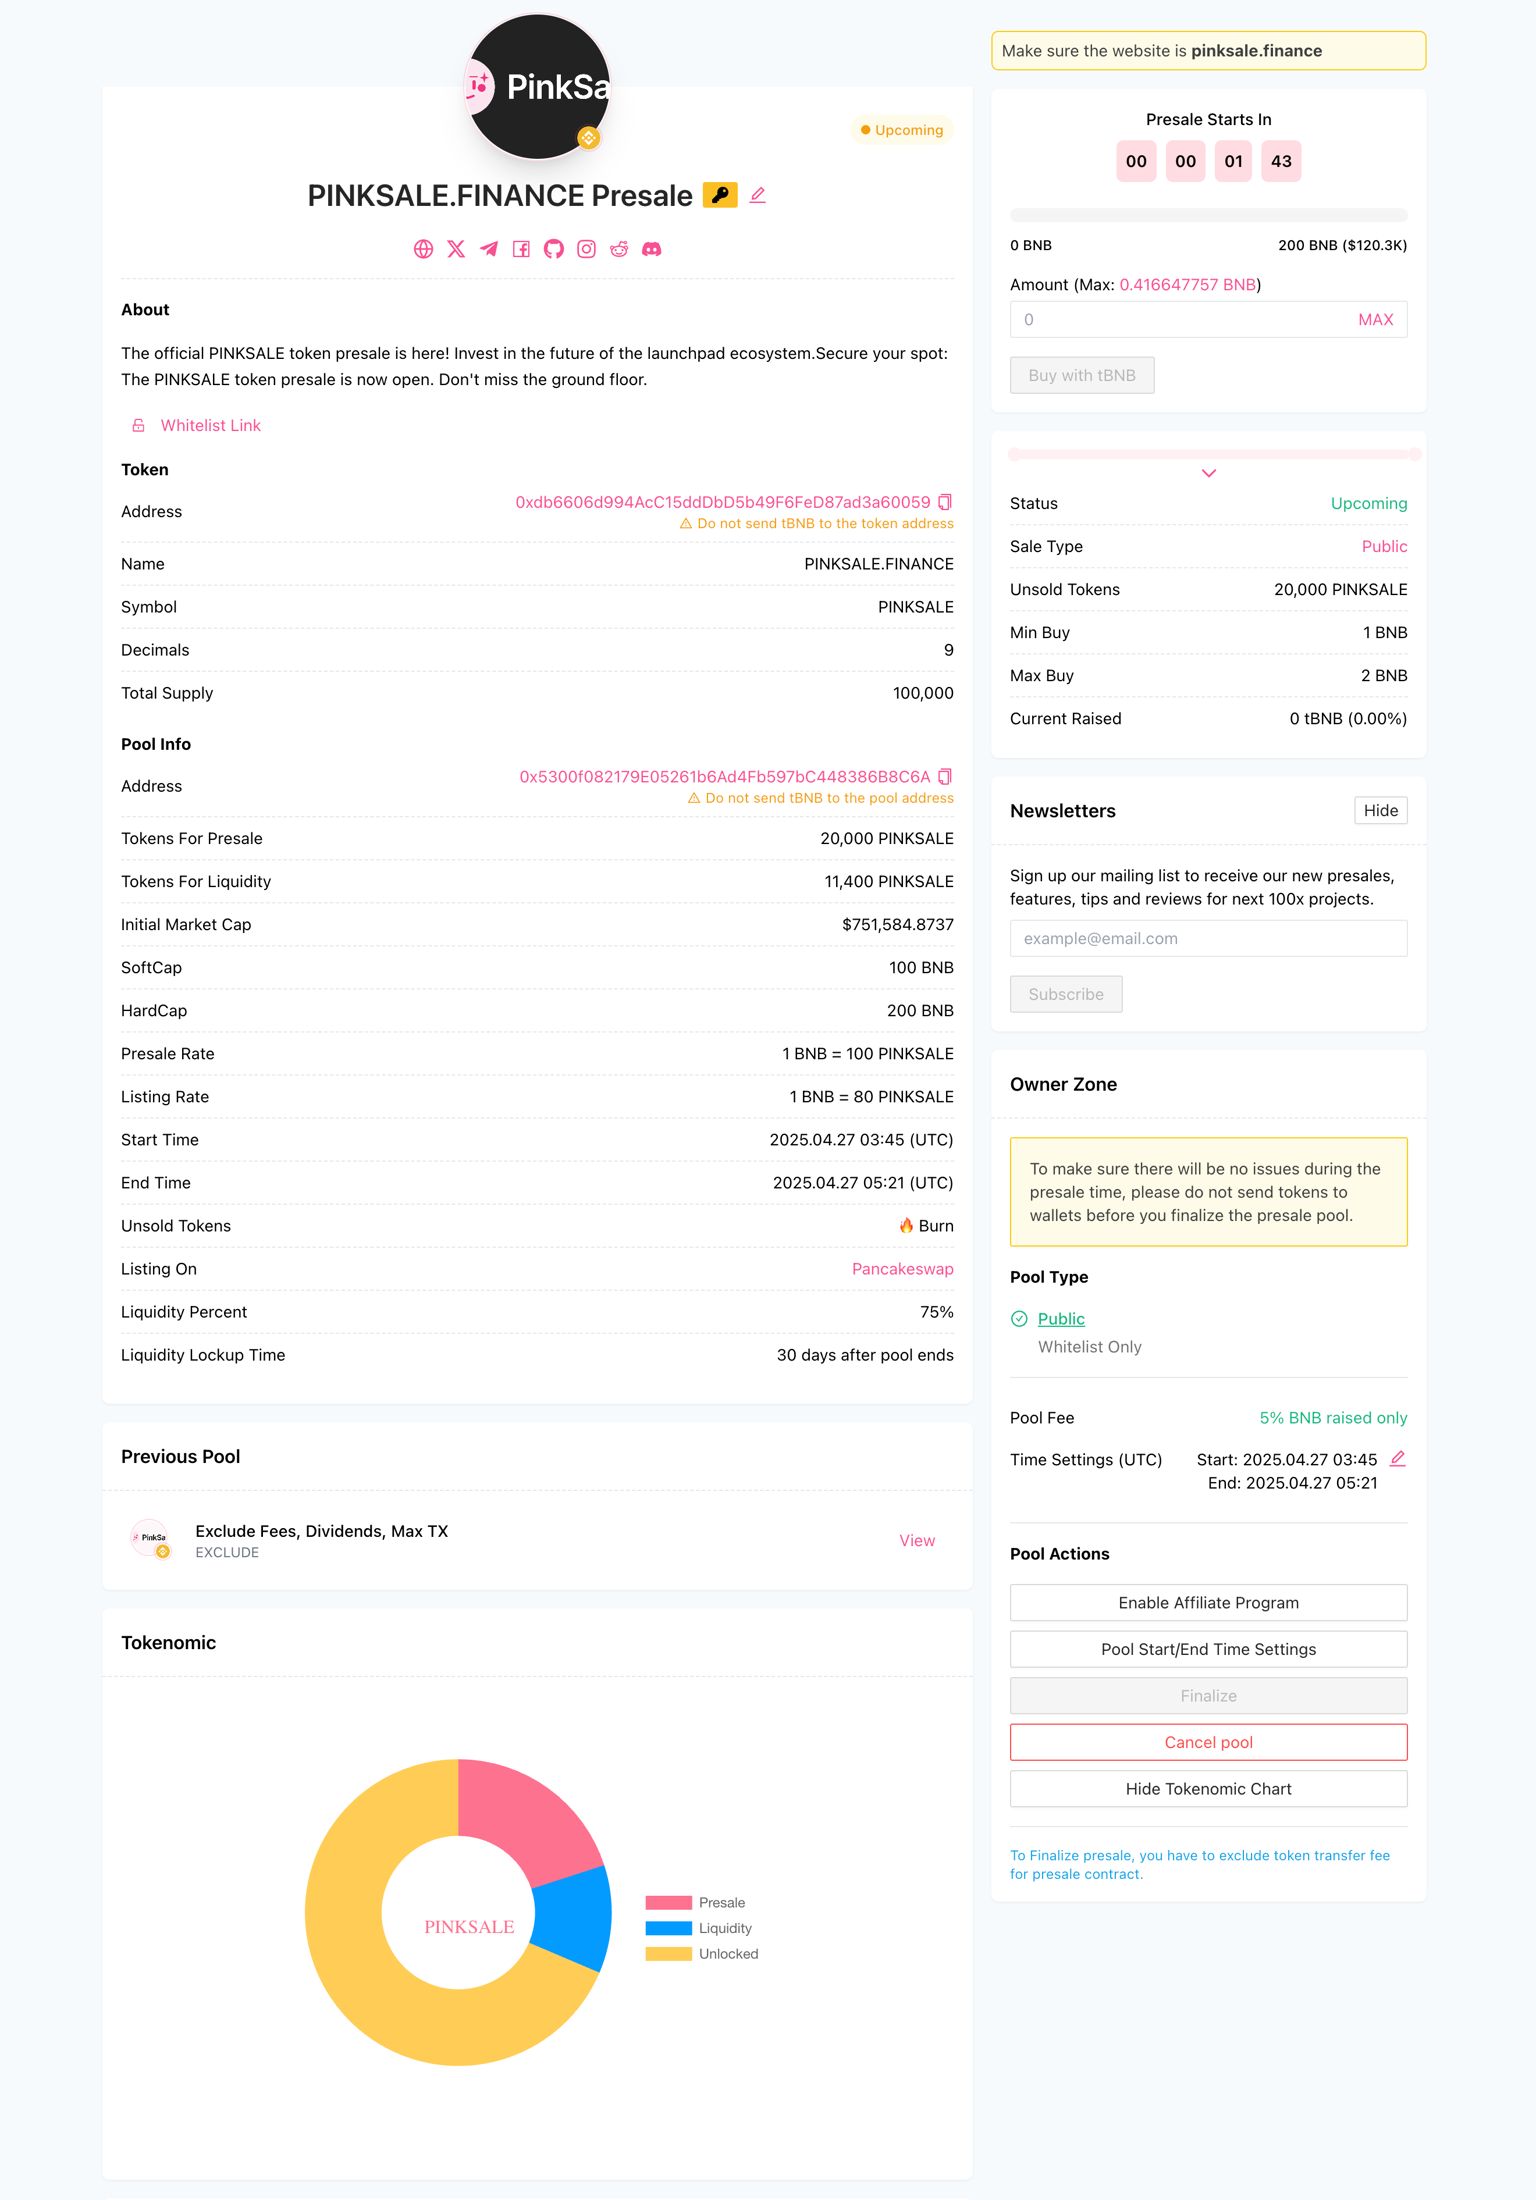
Presale Step 6: What your listing page looks like
This is what the “finished listing” looks like to investors: token address, caps, router, tokenomics chart, actions, etc.
Whether you choose a presale or a fair launch, one effective approach is to study trending crypto projects. Analyze their social media presence, join their community channels, observe how they promote, which influencers they work with, and how their marketing is structured. This is the same approach we used when launching one of our projects
Here is a current trending project on PinkSale that you can look up to:
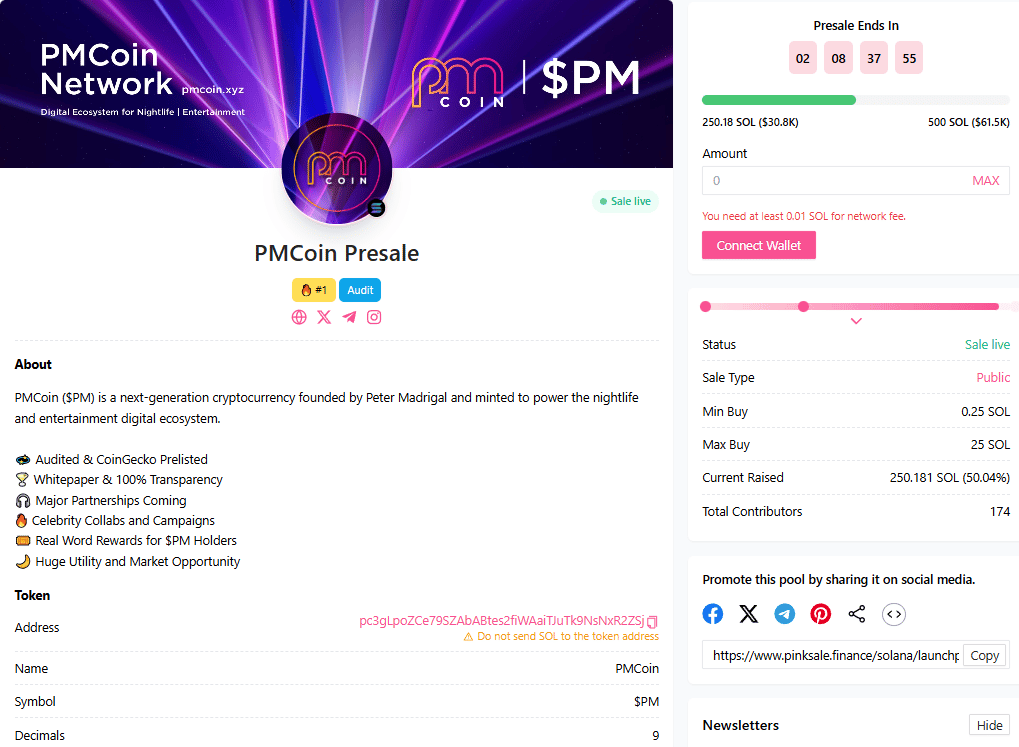
You can try to mimic their steps since they’re already proven. But in the end, taking what fits you and your project best is what really works 🕊️.
4B) PinkSale Fairlaunch:
PinkSale’s official fairlaunch guide is also 4 steps (verify token → fairlaunch info → additional info → finish).
Fairlaunch Step 1: Find “Create fairlaunch”

Fairlaunch Step 2: Verify token + fee + currency + listing option

Fairlaunch Step 3: Fairlaunch info
Fairlaunch Step 4: Additional info (logo, banner, socials, description)
PinkSale even mentions you can use an AI generator for visuals on-platform (logo / banner).

Fairlaunch Step 5: Approve spending token
Fairlaunch Step 6: Confirm & Create Launchpad
Fairlaunch Step 7: The finished fairlaunch page

5) The “raise parameters” that make you look legit
You should focus on setting realistic goals, especially for hard caps, because if you set it too high without marketing, you simply won’t reach it.
It also gives a very practical budgeting mindset: to raise something like 250 BNB, many projects spend roughly 50 BNB on marketing, though it can vary.

This is one of the most important beginner truths:
-
Your caps + liquidity % + lock time tell investors what kind of project you are.
-
If those numbers look chaotic, people assume the team is chaotic.

AI can also help here:
-
I ask AI to “stress test” my parameters like a risk manager.
-
Example prompt:
“Here are my PinkSale settings (soft cap, hard cap, liquidity %, lock). Pretend you are a cautious investor. What looks normal and what looks suspicious? Be strict.”
6) Badges + trending
Now let’s say:
-
Trending by volume is #1.
-
Then KYC + Audit is a strong combo to trend.
-
And there are 4 badge types mentioned: KYC, Audit, CFO, Docs.
-
It also mentions that an audit badge at least is the “bare minimum” if you want easier trending.
AI helps here in a clean way:
-
I use AI to write transparent FAQ answers about KYC/Audit (without overselling).
-
I use AI to draft updates for the listing period (short, consistent, not spammy).
7) Finalize the sale → liquidity gets created → trading gets enabled
This is where most beginners don’t understand what’s happening behind the scenes.
Let’s describe it like this:
-
After the fairlaunch/presale is finalized, a big portion goes to your wallet and the rest goes into the liquidity pool. Then trading is enabled on the selected DEX (like PancakeSwap).
-
The finalize process also includes distributing tokens to contributors and creating liquidity (if auto-listing is selected).
-
A real-world “finalize flow”: meet soft cap, end the sale, sometimes exclude the presale address from fees/limits, distribute tokens, then enable trading and announce it ahead of time.
How AI helps here
I use ChatGPT/Claude to create a Finalize Checklist in simple English, so I don’t miss steps under pressure.
-
Example prompt:
“Turn this finalize process into a safe checklist: meeting soft cap, ending pool, excluding presale address if needed, distributing tokens, announcing trading time, enabling trading. Keep it beginner proof.”
8) Post-launch overview
-
marketing
-
booking visibility spots on screeners
-
applying to CoinMarketCap and CoinGecko
-
and potentially CEX listing later if you have funds
This is the honest truth:
-
Launching is not the end.
-
Post-launch is where projects either become “real” or fade away.
AI tools I use heavily post-launch:
-
Perplexity: to find the correct forms, guidelines, and latest requirements for listings (CMC/CG processes can change).
-
ChatGPT / Claude / Gemini: to write clean announcements, reduce drama, and keep communication consistent.
-
Notion AI: to maintain a “Post-Launch Command Center” page: links, tasks, dates, and PR drafts.
Optional (more advanced, but useful):
-
AI analytics platforms like Token Metrics/ DexCheck AI/ Powerdrill AI.
So that’s it for now. This journey has ended but the next chapter is yet to come. This is the first course I’ve ever written, and I hope you picked up a thing or two along the way 😁. Feel free to leave feedback, comment on my posts, or let me know if you want more AI and crypto lessons, tutorials, or real experiences shared next. We are trying our best to improve our content so we can provide you with better experience. Maybe… in the near future there will be more courses 🤘.
And once again, here are the links of all the lessons from this course. You can also check these out on our website at: thecryptofire.com. Good luck cryptoing! 🔥
-
AI x Crypto Lesson 2: CEX vs DEX & “Not Your Keys, Not Your Crypto”
-
AI x Crypto Lesson 3: Wallets & Security: Your Crypto Safe House
-
AI x Crypto Lesson 5: Everything you need to know about Tokenomics and Narratives
-
AI x Crypto Lesson 7: Using AI to learn, research & verify project
-
AI x Crypto Lesson 8: Design your first Token idea with AI Step by Step
If you enjoy this lesson, please let me know and check out these amazing news, contents, experiences and tutorials related to AI and Crypto from our team down below🔥✌️:
Leave a Reply